背景 Kubernetes 原生支持对于CPU和内存资源的发现,但是有很多其他的设备 kubelet不能原生处理,比如GPU、FPGA、RDMA、存储设备和其他类似的异构计算资源设备,类比csi、 cni等提出了 device plugin这种机制。
Device plugin 原理 在k8s资源视角,每一个device 看作一种扩展资源,名字是自定义的。pod在使用时和memory及cpu一致,而且只能整数,还不能小数。
kubelet 启动后,由container Manager模块, 它在启动cpu manager后启动 device plugin manager子模块.
每个 device plugin 本质 grpc server 且以daemonset形式运行, 会自动向1中的manager注册, 最后执行 kubectl describe nodes的时候,相关设备会出现在node status中:vendor-domain/vendor-device, 且为了感知到设备的变动,listandWatch机制不断维护该状态。
k8s 感知到device 后,pod可以通过使用资源。kubelet通过 allocate接口,返回runtime 加载该device资源的挂载点,环境变量等信信息。
当pod 声明使用nvidia.com/gpu资源nvidia-runtime, 它会将更新到oci spec中的device plugin相关配置,映射到容器中,是真正做事的。
container[0].resources.limits.nvidia.com/gpu: 1调用 allocate方法, 将DeviceID 转换为 NVIDIA_VISIBLE_DEVICES 环境变量,返回kubelet
kubelet将环境变量注入到Pod, 启动容器
容器启动时, gpu-container-runtime 调用 gpu-containers-runtime-hook, 根据容器的 NVIDIA_VISIBLE_DEVICES 环境变量,转换为 --devices 参数,调用 nvidia-container-cli prestart
nvidia-container-cli 根据 --devices ,将GPU设备映射到容器中。 并且将宿主机的Nvidia Driver Lib 的so文件也映射到容器中, 此时容器可以通过这些so文件,调用宿主机的Nvidia Driver。
kubelet 服务启动 kubelet device manager 服务启动 device manager
1
2
3
4
5
6
7
8
9
10
11
12
13
14
15
16
17
18
19
20
21
22
23
24
25
26
27
28
29
func (kl *Kubelet) Run(updates <-chan kubetypes.PodUpdate) { .... go wait.Until(kl.updateRuntimeUp, 5*time.Second, wait.NeverStop) ... } func (kl *Kubelet) updateRuntimeUp() { ... kl.oneTimeInitializer.Do(kl.initializeRuntimeDependentModules) ... } func (kl *Kubelet) initializeRuntimeDependentModules(){ // 启动 containerManager if err := kl.containerManager.Start(node, kl.GetActivePods, kl.sourcesReady, kl.statusManager, kl.runtimeService); err != nil { ... } // kubelet的plugin manager添加两个handler,即csiplugin 和 device plugin kl.pluginManager.AddHandler(pluginwatcherapi.CSIPlugin, plugincache.PluginHandler(csi.PluginHandler)) kl.pluginManager.AddHandler(pluginwatcherapi.DevicePlugin, kl.containerManager.GetPluginRegistrationHandler()) klog.V(4).Infof("starting plugin manager") // 启动plugin manager, 其内部有调谐机制,和volume manager类似, 卷设备其实也是一种设备。 go kl.pluginManager.Run(kl.sourcesReady, wait.NeverStop) }
位置:kubelet 支持多种 plugin, 比如csiplugin, device plugin, 所以需要有个 manager 负责管理.
扩展了解下plugin manager
1
2
3
4
5
6
7
8
9
10
11
12
13
14
15
16
17
18
19
20
klet.pluginManager = pluginmanager.NewPluginManager( klet.getPluginsRegistrationDir(), /* sockDir */ kubeDeps.Recorder, ) func (rc *reconciler) AddHandler(pluginType string, pluginHandler cache.PluginHandler) { rc.Lock() defer rc.Unlock() rc.handlers[pluginType] = pluginHandler } type PluginHandler interface { ValidatePlugin(pluginName string, endpoint string, versions []string) error RegisterPlugin(pluginName, endpoint string, versions []string) error DeRegisterPlugin(pluginName string) }
plugin 的注册路径 /var/lib/kubelet/plugins_registry/,given plugin handler for a specific plugin type, which will be added to the actual state of world cachepluginHandler不是函数,而是对象且要实现上面三个方法,因为对象是有许多方法的。对于 deviceplugin 其实就是 ManagerImpl, 其有GetWatcherHandler(), 位于pkg/kubelet/cm/devicemanager/manager.go
在 pkg/kubelet/cm/container_manager_linux.go
1
2
3
4
5
6
7
8
9
func (cm *containerManagerImpl) Start(){ // 启动 cpu manager err = cm.cpuManager.Start(cpumanager.ActivePodsFunc(activePods), sourcesReady, podStatusProvider, runtimeService, containerMap) // 启动 device manager if err := cm.deviceManager.Start(devicemanager.ActivePodsFunc(activePods), sourcesReady); err != nil { return err } }
device manager是和底层runtime 相关的,所以device manager是 container manager的子模块, 由 container manager 驱动运行。
重新回到 container manager的 start()
1
2
3
4
5
6
7
8
9
10
11
12
13
14
15
16
17
18
19
20
21
22
23
24
25
26
func (m *ManagerImpl) Start(activePods ActivePodsFunc, sourcesReady config.SourcesReady) error { // 从磁盘读取已经分配的device信息。 err := m.readCheckpoint() // 删除socket, device plugin会通过fsnotify感知,并重新向manager注册, 因为manager 刚启动 err := m.removeContents(m.socketdir) s, err := net.Listen("unix", socketPath) if err != nil { klog.Errorf(errListenSocket+" %v", err) return err } m.wg.Add(1) m.server = grpc.NewServer([]grpc.ServerOption{}...) // m 提供注册服务 pluginapi.RegisterRegistrationServer(m.server, m) go func() { defer m.wg.Done() m.server.Serve(s) }() klog.V(2).Infof("Serving device plugin registration server on %q", socketPath) }
从磁盘读取数据,已分配的 device info 会持久化到
启动 grpc server, 提供 device plugin 注册功能, client 就是每个 device plugin 的register接口。当 device plugin 容器启动时,会自动注册
注册服务的server侧对象是m
下面以 nvidia device plugin 启动分析注册流程
nvidia device plugin 启动流程 1 2 3 4 5 6 7 8 9 10 11 12 13 14 15 16 17 18 19 20 21 22 23 24 25 26 27 28 29 30 31 32 33 34 35 36 37 38 39 40 41 42 43 44 45 46 47 48 49 50 51 52 53 54 55 56 57 58 59 60 61 62 63 64 65 func start(c *cli.Context, flags []cli.Flag) error { // 监控 fs, "/var/lib/kubelet/device-plugins/" watcher, err := newFSWatcher(pluginapi.DevicePluginPath) // 监控 os 信号 sigs := newOSWatcher(syscall.SIGHUP, syscall.SIGINT, syscall.SIGTERM, syscall.SIGQUIT) var restarting bool var restartTimeout <-chan time.Time restart: // if restarting { err := stopPlugins(plugins) if err != nil { return fmt.Errorf("error stopping plugins from previous run: %v", err) } } // 主要流程,启动plugins // 启动结果分成两类,启动成功的plugin,需要重启的plugin. plugins, restartPlugins, err := startPlugins(c, flags, restarting) // 只要有一个重新启动的plugin. 30s重新启动所有 if restartPlugins { klog.Infof("Failed to start one or more plugins. Retrying in 30s...") restartTimeout = time.After(30 * time.Second) } // 表示需要重启,之前启动成功的plugins也需要先stop再start,做重新启动。 restarting = true // 启动死循环,监听事件来记录log, 重启plugin, 退出程序。 for { select { // 重启倒计时结束,触发重启 case <-restartTimeout: goto restart // 检测socket 文件是否新建事件,判断kubelet重启了 case event := <-watcher.Events: if event.Name == pluginapi.KubeletSocket && event.Op&fsnotify.Create == fsnotify.Create { klog.Infof("inotify: %s created, restarting.", pluginapi.KubeletSocket) goto restart } // fs 是否有其他错误 case err := <-watcher.Errors: klog.Infof("inotify: %s", err) // 检测操作系统的信号 case s := <-sigs: switch s { case syscall.SIGHUP: klog.Info("Received SIGHUP, restarting.") goto restart default: klog.Infof("Received signal \"%v\", shutting down.", s) goto exit } } } exit: err = stopPlugins(plugins) if err != nil { return fmt.Errorf("error stopping plugins: %v", err) } return nil }
保证将所有plugins一次启动成功,部分成功会先stop再restart。
监控fs和os两侧事件
在同一个func中,通过restart: exit:, 函数循环体,比较符合人的思维。
下面看主要函数 startPlugins
startPlugins 1 2 3 4 5 6 7 8 9 10 11 12 13 14 15 16 17 18 19 func startPlugins(c *cli.Context, flags []cli.Flag, restarting bool) ([]plugin.Interface, bool, error) { config, err := loadConfig(c, flags) pluginManager, err := NewPluginManager(config) plugins, err := pluginManager.GetPlugins() started := 0 for _, p := range plugins { if err := p.Start(); err != nil { ... } started++ } return plugins, false, nil }
加载配置
新建 plugi Manager对象,并获取所有的plugins, 这侧也需要plugin manager来管理多个plugin。
遍历,启动每一个plugin
plugin manager的创建 1 2 3 4 5 6 7 8 9 10 11 12 13 14 15 16 17 18 19 20 21 22 23 24 25 26 27 28 func NewPluginManager(config *spec.Config) (manager.Interface, error) { // 多实例gpu支持3种策略 // 对策略进行检查,这种写法扩展时清晰 switch *config.Flags.MigStrategy { case spec.MigStrategyNone: case spec.MigStrategySingle: case spec.MigStrategyMixed: default: return nil, fmt.Errorf("unknown strategy: %v", *config.Flags.MigStrategy) } // 初始化空的nvml lib对象 nvmllib := nvml.New() // cdi开关 cdiEnabled := deviceListStrategies.IsCDIEnabled() // cdi handler cdiHandler, err := cdi.New(...) // 新建 manager m, err := manager.New(...) // 将`cdi spec` 写入到`/var/run/cdi/nvidia.com-gpu.json`文 // 形如vendor/class: nvidia.com/gpu, spec的名字就是 `nvidia.com-gpu` if err := m.CreateCDISpecFile(); err != nil { return nil, fmt.Errorf("unable to create cdi spec file: %v", err) } return m, nil }
manager 支持三种 mode,
nvml
m.nvmllib对象及初始化,即加载libnvidia-ml.so.1 这个动态库
tegra
null
由该方法根据os当前的配置确定mode
1 2 3 4 5 6 func (m *manager) resolveMode() (string, error) { // 是否可以open libnvidia-ml.so.1 这个动态库 hasNVML := logWithReason(m.infolib.HasNvml, "NVML") // 检查/etc/nv_tegra_release和/sys/devices/soc0/family 文件 isTegra := logWithReason(m.infolib.IsTegraSystem, "Tegra") }
mamager get plugins plugin manager 对象创建好后,它需要知道所管理的所有 plugins 对象.
获取节点上和 nvml 资源有关的 plugins.
1 2 3 4 5 6 7 8 9 10 11 func (m *nvmlmanager) GetPlugins() ([]plugin.Interface, error) { // 新建 nvml resource manager集合 rms, err := rm.NewNVMLResourceManagers(m.nvmllib, m.config) var plugins []plugin.Interface // 对于每一个 resource manager 都创建 对应的一个Nvidia Device Plugin对象 for _, r := range rms { plugins = append(plugins, plugin.NewNvidiaDevicePlugin(m.config, r, m.cdiHandler, m.cdiEnabled)) } return plugins, nil }
1 2 3 4 5 6 7 8 9 10 11 12 13 14 15 16 17 18 19 20 21 22 23 24 // returns a set of ResourceManagers, one for each NVML resource in 'config'. func NewNVMLResourceManagers(nvmllib nvml.Interface, config *spec.Config) ([]ResourceManager, error) { ret := nvmllib.Init() // 重要, 所有device都维护在这个map中 deviceMap, err := NewDeviceMap(nvmllib, config) for resourceName, devices := range deviceMap { if len(devices) == 0 { continue } r := &nvmlResourceManager{ resourceManager: resourceManager{ config: config, resource: resourceName, devices: devices, }, nvml: nvmllib, } rms = append(rms, r) } return rms, nil }
1 2 // DeviceMap stores a set of devices per resource name. type DeviceMap map[spec.ResourceName]Devices
对config中的每一个nvml资源,都会生成一个resource manager。
通过 nvmllib 和 config, 构建 deviceMap 对象, key是自定义的资源的名字, v是设备对象。
对每一种资源名字 resourceName 会创建一个resource manager,也会对应创建一个device plugin, 所以device plugin 是以资源名字为单位管理的。
节点上设备是通过 NewDeviceMap() 维护在 devicemap 这个对象中, 内部比较复杂,有时间再细细研究。
1 2 3 4 5 6 7 8 9 10 11 12 13 14 15 16 17 18 19 20 21 22 23 24 25 26 27 28 29 30 31 32 33 34 35 // BuildDevice builds an rm.Device with the specified index and deviceInfo func BuildDevice(index string, d deviceInfo) (*Device, error) { // 获取 gpu 的 uuid uuid, err := d.GetUUID() if err != nil { return nil, fmt.Errorf("error getting UUID device: %v", err) } // 获取 gpu instance device 的路径 paths, err := d.GetPaths() if err != nil { return nil, fmt.Errorf("error getting device paths: %v", err) } hasNuma, numa, err := d.GetNumaNode() if err != nil { return nil, fmt.Errorf("error getting device NUMA node: %v", err) } dev := Device{} dev.ID = uuid dev.Index = index dev.Paths = paths dev.Health = pluginapi.Healthy if hasNuma { dev.Topology = &pluginapi.TopologyInfo{ Nodes: []*pluginapi.NUMANode{ { ID: int64(numa), }, }, } } return &dev, nil }
device plugin 工作机制 一种自定义资源名字,就对应一个device plugin 及其 resource manager
核心的接口有两个
ListAndWatch
长链接
资源上报, 设备id
健康检查,不健康设备从 device plugin framework 从可调度设备中移除
Allocate
创建容器时,传入要使用设备的id, 返回的参数是容器启动时,需要的设备、数据卷以及环境变量。
grpc api 定义 vendor/k8s.io/kubelet/pkg/apis/deviceplugin/v1beta1/api.pb.go
NVIDIA/k8s-device-plugin以nvidia.com/gpu这种GPU资源为例
英伟达插件对象,其由多个对象组合而成。
1 2 3 4 5 6 7 8 9 10 11 12 13 14 15 16 &NvidiaDevicePlugin{ rm: resourceManager, config: config, deviceListEnvvar: "NVIDIA_VISIBLE_DEVICES", deviceListStrategies: deviceListStrategies, socket: pluginapi.DevicePluginPath + "nvidia-" + name + ".sock", cdiHandler: cdiHandler, cdiEnabled: cdiEnabled, cdiAnnotationPrefix: *config.Flags.Plugin.CDIAnnotationPrefix, // These will be reinitialized every // time the plugin server is restarted. server: nil, health: nil, stop: nil, }
启动 grpc server 并上报 kubelet
1 2 3 4 5 6 7 8 9 10 11 12 13 14 15 16 17 18 19 func (plugin *NvidiaDevicePlugin) Start() error { // 初始化grpc server plugin.initialize() // 启动grpc server // 每个资源都有自己的sock地址 err := plugin.Serve() // 作为grpc client, 向kubelet注册client // sock地址/var/lib/kubelet/device-plugins/kubelet.sock err = plugin.Register() go func() { // 往unhealthy 这个channel写入事件, 该channel在listAndWatch接口会使用 plugin.rm.CheckHealth(plugin.stop, plugin.health) } // 本device 启动完成 return nil }
1 2 3 4 5 6 7 8 9 10 11 12 13 14 15 16 17 18 19 20 21 22 23 24 25 26 27 28 29 30 31 32 33 34 35 36 37 38 func (plugin *NvidiaDevicePlugin) Serve() error { os.Remove(plugin.socket) // 监听连接本plugin的sock地址, "/var/lib/kubelet/device-plugins/" + "nvidia-" + name + ".sock" sock, err := net.Listen("unix", plugin.socket) if err != nil { return err } // 注册grpc server的服务端, plugin对象实现接口规定的方法 pluginapi.RegisterDevicePluginServer(plugin.server, plugin) // 因为server是阻塞式,单独启goroutine运行, // 如果启动成功退出 go func() { lastCrashTime := time.Now() restartCount := 0 for { // 启动grpc server err := plugin.server.Serve(sock) // 成功,退出for循环, 以goroutine单独运行server if err == nil { break } // 当前失败重试这块代码逻辑看不到什么意义 } }() // 单独启server的goroutine,通过for 死循环启动server. // 父goroutine dial阻塞,给新建goroutine 的for循环些时间去启动grpc server。dial说明启动成功,parent goroutine 可以退出了。 conn, err := plugin.dial(plugin.socket, 5*time.Second) if err != nil { return err } conn.Close() return nil }
先启动 device plugin 这侧的server, 此时并没有提供服务
通过register向kubelet注册资源,注册成功后
启动对device的健康检查
关键点是在register
register 通过 grpc 方式, socket是/var/lib/kubelet/device-plugins/kubelet.sock, device plugin 作为 grpc client, kubelet device plugin manager 作为 grpc server, 将获取对应设备资源的数量上报给 kubelet 。
位置 k8s-device-plugin/internal/plugin/server.go
1 2 3 4 5 6 7 8 9 10 11 12 13 14 15 16 17 18 19 20 21 22 23 24 25 func (plugin *NvidiaDevicePlugin) Register() error { // /var/lib/kubelet/device-plugins/kublelet.sock 通过这个sock 向kubelet 发起呼叫 conn, err := plugin.dial(pluginapi.KubeletSocket, 5*time.Second) if err != nil { return err } defer conn.Close() client := pluginapi.NewRegistrationClient(conn) reqt := &pluginapi.RegisterRequest{ Version: pluginapi.Version, Endpoint: path.Base(plugin.socket), ResourceName: string(plugin.rm.Resource()), Options: &pluginapi.DevicePluginOptions{ GetPreferredAllocationAvailable: true, }, } // 调用 server 侧的 Register 方法 _, err = client.Register(context.Background(), reqt) if err != nil { return err } return nil }
我在哪?,Endpoint:nvidia- + <name> + ".sock", 告知kublet与device通信的sock, 因为一个节点上可能有多个设备
我是谁?,ResourceName: 告知 device plugin 所管理的设备名称,是 GPU 还是 RDMA, 方便其识别管理
交互协议, Version, API 的版本
kubelet device plugin manager 提供 device plugin 的注册服务
1 2 3 4 5 6 7 func (m *ManagerImpl) Register(ctx context.Context, r *pluginapi.RegisterRequest) (*pluginapi.Empty, error) { klog.Infof("Got registration request from device plugin with resource name %q", r.ResourceName) // 一种device plugin,就起一个协程处理,完成endpoint的注册, 一个endpoint代表一中devices设备资源 go m.addEndpoint(r) return &pluginapi.Empty{}, nil }
1 2 3 4 5 6 7 8 9 10 11 12 13 14 15 16 func (m *ManagerImpl) addEndpoint(r *pluginapi.RegisterRequest) { // /var/lib/kubelet/device-plugins/xxx // 根据传过来的 endpoint, 新建连接对象 new, err := newEndpointImpl(filepath.Join(m.socketdir, r.Endpoint), r.ResourceName, m.callback) if err != nil { klog.Errorf("Failed to dial device plugin with request %v: %v", r, err) return } // 将endpoint 注册到 m.endpoints 这个map中 m.registerEndpoint(r.ResourceName, r.Options, new) // 再启动一个goroutine,去对接该 endpoint, 因为listandwatch是阻塞式的 go func() { m.runEndpoint(r.ResourceName, new) }() }
每一个 device上报自己的sock, manager启动协程去dial并建立grpc通信。
在 csi 中通过 master csi driver 去支持多个 csi driver 是可以借鉴的。
一个endpoint 就可以链接一个device
1 2 3 4 5 6 7 8 9 10 11 12 13 14 func (m *ManagerImpl) runEndpoint(resourceName string, e endpoint) { // 向 endpoint 发起 listandwatch 流式调用。 e.run() e.stop() m.mutex.Lock() defer m.mutex.Unlock() // listandwatch 异常了,表示device资源异常 if old, ok := m.endpoints[resourceName]; ok && old.e == e { m.markResourceUnhealthy(resourceName) } klog.V(2).Infof("Endpoint (%s, %v) became unhealthy", resourceName, e) }
kubelet device plugin manager 化身为 client, 调用 device plugin 的 ListAndWatch 流式 response。
1 2 3 4 5 6 7 8 9 10 11 12 13 14 15 16 17 18 19 20 21 22 23 24 25 26 27 28 func (e *endpointImpl) run() { stream, err := e.client.ListAndWatch(context.Background(), &pluginapi.Empty{}) if err != nil { klog.Errorf(errListAndWatch, e.resourceName, err) return } // 不停从流拿到response for { response, err := stream.Recv() if err != nil { klog.Errorf(errListAndWatch, e.resourceName, err) return } // 拿到上报额device对象列表 devs := response.Devices klog.V(2).Infof("State pushed for device plugin %s", e.resourceName) var newDevs []pluginapi.Device for _, d := range devs { newDevs = append(newDevs, *d) } // 通知 manager, 调整可用资源信息 e.callback(e.resourceName, newDevs) } }
上报上来的 device 对象状态更新
device 对象样例
1 2 3 4 5 6 7 struct Device { ID: "GPU-fef8089b-4820-abfc-e83e-94318197576e", Health: "Healthy", Topology: Node: ID: 1 }
listandWatch只是拿到如上信息, 控制面需要用device id, 让数据面准备容器可以使用device的参数
ListAndWatch 1 2 3 4 5 6 7 8 9 10 11 12 13 14 15 16 17 18 19 20 21 // ListAndWatch lists devices and update that list according to the health status func (plugin *NvidiaDevicePlugin) ListAndWatch(e *pluginapi.Empty, s pluginapi.DevicePlugin_ListAndWatchServer) error { // 主动上报一次所有的device s.Send(&pluginapi.ListAndWatchResponse{Devices: plugin.apiDevices()}) // 不停的对事件进行监听 for { select { case <-plugin.stop: return nil case d := <-plugin.health: // 检测到device不健康了,则修改device的health状态,并再次主动上报, kubelet侧过滤掉不健康的device, 防止pod调度到不可用的device node上 // 目前还缺少device健康恢复的逻辑,可以开发FIXME // FIXME: there is no way to recover from the Unhealthy state. d.Health = pluginapi.Unhealthy klog.Infof("'%s' device marked unhealthy: %s", plugin.rm.Resource(), d.ID) s.Send(&pluginapi.ListAndWatchResponse{Devices: plugin.apiDevices()}) } } }
也就是说 listAndWatch 总是会拿到所有的 device 列表,但是根据device的健康检查不时去更新device的健康状态。
因为没有健康恢复,如果device都挨个不健康一次又恢复,当前版本是不能再次启动它,到最后就是没有可用的device了, 这是一个潜在的重大缺陷。
kubelet 更新device 1 2 3 4 5 6 7 8 9 10 11 12 13 14 15 16 17 18 19 20 21 func (m *ManagerImpl) genericDeviceUpdateCallback(resourceName string, devices []pluginapi.Device) { m.mutex.Lock() // 每次更新都新建healthyDevices 和 unhealthyDevices 集合 // 也就是每次都是最新状态,全量更新。 m.healthyDevices[resourceName] = sets.NewString() m.unhealthyDevices[resourceName] = sets.NewString() m.allDevices[resourceName] = make(map[string]pluginapi.Device) for _, dev := range devices { m.allDevices[resourceName][dev.ID] = dev if dev.Health == pluginapi.Healthy { m.healthyDevices[resourceName].Insert(dev.ID) } else { m.unhealthyDevices[resourceName].Insert(dev.ID) } } m.mutex.Unlock() // 将healthy device信息和使用了该devices的pod信息记录在/var/lib/kubelet/device-plugins/kubelet_internal_checkpoint文件 if err := m.writeCheckpoint(); err != nil { klog.Errorf("writing checkpoint encountered %v", err) } }
ManagerImpl.Allocate 1 2 3 4 5 6 7 8 9 10 11 12 13 14 15 16 17 18 19 20 21 22 func (kl *Kubelet) HandlePodAdditions(pods []*v1.Pod) { for _, pod := range pods { if !kl.podWorkers.IsPodTerminationRequested(pod.UID) { activePods := kl.filterOutInactivePods(existingPods) // Check if we can admit the pod; if not, reject it. if ok, reason, message := kl.canAdmitPod(activePods, pod); !ok { kl.rejectPod(pod, reason, message) continue } } } } func (kl *Kubelet) rejectPod(pod *v1.Pod, reason, message string) { kl.recorder.Eventf(pod, v1.EventTypeWarning, reason, message) kl.statusManager.SetPodStatus(pod, v1.PodStatus{ Phase: v1.PodFailed, Reason: reason, Message: "Pod " + message}) }
对于传入的每一个 Pod ,如果它没有被 terminate(查看podwork.podSyncStatuses中terminatingAt字段是否被设置),则通过 canAdmitPod 检查是否可以允许该 Pod 创建。
否则拒绝pod, 即不去派活(dispatchwork),报告事件并设置pod的Status失败的原因, 这样做的好处是提前检查pod的依赖资源是否ok, 否则去派活最后缺因为依赖资源不满足而失败,浪费了运行时了。1 2 3 4 5 6 7 8 9 10 func (kl *Kubelet) canAdmitPod(pods []*v1.Pod, pod *v1.Pod) (bool, string, string) { attrs := &lifecycle.PodAdmitAttributes{Pod: pod, OtherPods: pods} for _, podAdmitHandler := range kl.admitHandlers { if result := podAdmitHandler.Admit(attrs); !result.Admit { return false, result.Reason, result.Message } } return true, "", "" }
activePod都要经过kubelet中admintHandlers的准允检查,即对pod的资源做一些控制面的提前判断,目的是保证数据面的成功,只有有一个不允许,则不允许派活并在pod Status设置失败的原因。
evictionAdmitHandler
critical pod 直接允许
根据 nodeConditions 对象得到当前node资源
当节点有内存压力时,拒绝创建best effort的pod,还有其它条件先略过。当然如果best effort 容忍了memory pressure taints也是准许pod创建的。
TopologyPodAdmitHandle
拒绝创建因为Topology locality冲突而无法分配资源的pod
kubelet 创建时,通过addPodAdmitHandler(), 添加了8个handler
1 2 3 4 5 6 7 8 klet.admitHandlers.AddPodAdmitHandler(evictionAdmitHandler) klet.admitHandlers.AddPodAdmitHandler(sysctlsAllowlist) klet.admitHandlers.AddPodAdmitHandler(klet.containerManager.GetAllocateResourcesPodAdmitHandler()) klet.admitHandlers.AddPodAdmitHandler(lifecycle.NewPredicateAdmitHandler(klet.getNodeAnyWay, criticalPodAdmissionHandler, klet.containerManager.UpdatePluginResources)) klet.softAdmitHandlers.AddPodAdmitHandler(lifecycle.NewAppArmorAdmitHandler(klet.appArmorValidator)) klet.softAdmitHandlers.AddPodAdmitHandler(lifecycle.NewNoNewPrivsAdmitHandler(klet.containerRuntime)) klet.softAdmitHandlers.AddPodAdmitHandler(lifecycle.NewProcMountAdmitHandler(klet.containerRuntime)) klet.admitHandlers.AddPodAdmitHandler(shutdownAdmitHandler)
与 DevicePlugin 相关的则是 containerManager 的 resourceAllocator,deviceManager 和 cpuManager 的 memoryManager 组成, 分别调用这三者的 Allocate() 分配资源。
1 2 3 4 5 6 func (cm *containerManagerImpl) GetAllocateResourcesPodAdmitHandler() lifecycle.PodAdmitHandler { if utilfeature.DefaultFeatureGate.Enabled(kubefeatures.TopologyManager) { return cm.topologyManager } return &resourceAllocator{cm.cpuManager, cm.memoryManager, cm.deviceManager} }
1 2 3 4 5 6 7 8 9 10 11 12 13 14 15 16 17 18 19 20 21 22 23 24 25 26 27 28 29 func (m *resourceAllocator) Admit(attrs *lifecycle.PodAdmitAttributes) lifecycle.PodAdmitResult { pod := attrs.Pod // 遍历当前pod的InitContainers + Containers for _, container := range append(pod.Spec.InitContainers, pod.Spec.Containers...) { // device 的 allocate err := m.deviceManager.Allocate(pod, &container) if err != nil { return admission.GetPodAdmitResult(err) } // cpu的manager if m.cpuManager != nil { err = m.cpuManager.Allocate(pod, &container) if err != nil { return admission.GetPodAdmitResult(err) } } // memroy的allocate if m.memoryManager != nil { err = m.memoryManager.Allocate(pod, &container) if err != nil { return admission.GetPodAdmitResult(err) } } } return admission.GetPodAdmitResult(nil) }
这里查看 deviceManager.Allocate()
1 2 3 4 5 6 7 8 9 10 11 12 13 14 15 16 17 18 19 20 21 22 23 24 func (m *ManagerImpl) Allocate(pod *v1.Pod, container *v1.Container) error { if err := m.allocateContainerResources(pod, container, m.devicesToReuse[string(pod.UID)]); err != nil { return err } } func (m *ManagerImpl) allocateContainerResources(pod *v1.Pod, container *v1.Container, devicesToReuse map[string]sets.String) error { // 扩展资源不允许overcommitted // 因为device plugin 遍历扩展资源, 所以request和limit必须相等, 因为迭代limits就足够了 for k, v := range container.Resources.Limits { // 分配dev, 这里是控制面? allocDevices, err := m.devicesToAllocate(podUID, contName, resource, needed, devicesToReuse[resource]) // 向device plugin 发起 dev的allocation 请求。 // 这里是数据面? // 参数是string slice devs := allocDevices.UnsortedList() resp, err := eI.e.allocate(devs) // 数据面流程结束,将分配结果维护到podDevices缓存中,为了控制面做决策时使用 m.podDevices.insert(podUID, contName, resource, allocDevicesWithNUMA, resp.ContainerResponses[0]) } }
控制面是咋分配的devices呢?
1 2 3 4 5 6 7 8 9 10 11 12 13 14 15 16 17 18 19 20 21 22 23 24 25 26 27 28 29 30 31 32 33 34 35 36 37 38 39 40 41 42 43 44 45 46 func (m *ManagerImpl) devicesToAllocate(podUID, contName, resource string, required int, reusableDevices sets.String) (sets.String, error) { // 从manager维护的podDevices找是否device已经分配了,适用于容器重启case devices := m.podDevices.containerDevices(podUID, contName, resource) // 到这里说明新分配device, 则从manager 维护的healthyDevices里找,这个对象是device plugin 注册时主动上报的健康资源集合。 // 如果没有找到,则表明资源没注册 if _, ok := m.healthyDevices[resource]; !ok { return nil, fmt.Errorf("can't allocate unregistered device %s", resource) } // 闭包函数,将分配的devices列表,更新到m.allocatedDevices 和 allocated 缓存中 allocateRemainingFrom := func(devices sets.String) bool { for device := range devices.Difference(allocated) { m.allocatedDevices[resource].Insert(device) allocated.Insert(device) needed-- if needed == 0 { return true } } return false } // 到这里说明,device是在上报资源中,而且是第一次分配使用 // 1. 尝试init container分配的device里分,这部分device是reusableDevices, container可重复使用的device。 将device更新到m.allocatedDevices if allocateRemainingFrom(reusableDevices) { return allocated, nil } // 到这里说明 device 只有被container 单独使用,没有与init container复用 devicesInUse := m.allocatedDevices[resource] // Gets Available devices. // 还是得从healthyDevices里找可用的device资源 // difference表示 做差。 healthyDevice - devicesInUse available := m.healthyDevices[resource].Difference(devicesInUse) // 根据numa 亲和性区过滤出 available device集合 aligned, unaligned, noAffinity := m.filterByAffinity(podUID, contName, resource, available) // 从最后aligned 的device里分配合适的 device if allocateRemainingFrom(aligned) { return allocated, nil } }
plugin Allocate Allocate 接口给容器加上 NVIDIA_VISIBLE_DEVICES 环境变量,设置了相关的 DeviceSpec参数,将 Response 返回给 Kubelet。
1 2 3 4 5 6 7 8 9 10 11 12 13 14 15 16 17 18 // 入参 reqs, 因为一个contianers可以申请多个device资源 func (plugin *NvidiaDevicePlugin) Allocate(ctx context.Context, reqs *pluginapi.AllocateRequest) (*pluginapi.AllocateResponse, error) { responses := pluginapi.AllocateResponse{} for _, req := range reqs.ContainerRequests { if plugin.config.Sharing.TimeSlicing.FailRequestsGreaterThanOne && rm.AnnotatedIDs(req.DevicesIDs).AnyHasAnnotations() { // gpu共享配置中,时分复用请求资源的资源只能是一个。 if len(req.DevicesIDs) > 1 { return nil, fmt.Errorf("request for '%v: %v' too large: maximum request size for shared resources is 1", plugin.rm.Resource(), len(req.DevicesIDs)) } } // 组装 response response, err := plugin.getAllocateResponse(req.DevicesIDs) responses.ContainerResponses = append(responses.ContainerResponses, response) } return &responses, nil }
1 2 3 4 5 6 7 8 9 10 11 12 13 14 15 16 17 18 19 20 21 22 23 24 25 26 27 28 29 30 31 32 33 34 35 func (plugin *NvidiaDevicePlugin) getAllocateResponse(requestIds []string) (*pluginapi.ContainerAllocateResponse, error) { deviceIDs := plugin.deviceIDsFromAnnotatedDeviceIDs(requestIds) responseID := uuid.New().String() response, err := plugin.getAllocateResponseForCDI(responseID, deviceIDs) if err != nil { return nil, fmt.Errorf("failed to get allocate response for CDI: %v", err) } // device env // 有两种设备列表的方式 // key都是NVIDIA_VISIBLE_DEVICES, 区别在于value // 如果是envvar 方式,则value是id1,id2,id3 // 如果是volume-mounts方式, value就一个值,“/var/run/nvidia-container-devices" if plugin.deviceListStrategies.Includes(spec.DeviceListStrategyEnvvar) { response.Envs = plugin.apiEnvs(plugin.deviceListEnvvar, deviceIDs) } // device mount if plugin.deviceListStrategies.Includes(spec.DeviceListStrategyVolumeMounts) { response.Envs = plugin.apiEnvs(plugin.deviceListEnvvar, []string{deviceListAsVolumeMountsContainerPathRoot}) response.Mounts = plugin.apiMounts(deviceIDs) } // device spec, 设备的详细说明 if *plugin.config.Flags.Plugin.PassDeviceSpecs { response.Devices = plugin.apiDeviceSpecs(*plugin.config.Flags.NvidiaDriverRoot, requestIds) } if *plugin.config.Flags.GDSEnabled { response.Envs["NVIDIA_GDS"] = "enabled" } if *plugin.config.Flags.MOFEDEnabled { response.Envs["NVIDIA_MOFED"] = "enabled" } return &response, nil }
nvidia device plugin 对象创建时设置了存放device列表的环境变量名字是 NVIDIA_VISIBLE_DEVICES。
1 2 3 4 5 &NvidiaDevicePlugin{ rm: resourceManager, config: config, deviceListEnvvar: "NVIDIA_VISIBLE_DEVICES", }
1 2 3 4 5 6 7 8 9 10 11 12 13 14 15 16 17 18 19 20 21 func (plugin *NvidiaDevicePlugin) apiEnvs(envvar string, deviceIDs []string) map[string]string { return map[string]string{ envvar: strings.Join(deviceIDs, ","), } } func (plugin *NvidiaDevicePlugin) apiMounts(deviceIDs []string) []*pluginapi.Mount { var mounts []*pluginapi.Mount // 每一个设备生成mount对象,包含 // hostPath: /dev/null, 以卷挂在方式呈现的设备列表在host侧的路径, // 在容器侧的路径: /var/run/nvidia-container-devices for _, id := range deviceIDs { mount := &pluginapi.Mount{ HostPath: deviceListAsVolumeMountsHostPath, ContainerPath: filepath.Join(deviceListAsVolumeMountsContainerPathRoot, id), } mounts = append(mounts, mount) } return mounts }
response 包含 env, mounts, devices 参数其中环境变量的key是NVIDIA_VISIBLE_DEVICES
allocate的作用非常简单,将 device-id 转成 NVIDIA_VISIBLE_DEVICES 环境变量, gpu-container-runtime 判断有该变量,知道该容器需要映射gpu设备,则将设备映射到容器中,且使用device的库Nvidia Driver Lib 也映射到容器中
allocate 返回的结果没有报错,resourceAllocator.admit()方法没有拒绝pod执行, 则派活调用cri去创建pod的运行实体
接口vendor/k8s.io/kubelet/pkg/apis/deviceplugin/v1beta1/api.pb.go
device的状态管理 根据manager维护的 healthyDevices 和 unhealthyDevices 统计总的device, 当前可用的device。该接口经过NodeStatus调用,持久化到etcd中,并更新node对象状态
1 2 3 4 5 6 7 8 9 10 11 func (m *ManagerImpl) GetCapacity() (v1.ResourceList, v1.ResourceList, []string) { for resourceName, devices := range m.healthyDevices { ... } for resourceName, devices := range m.unhealthyDevices { ... } return capacity, allocatable, deletedResources.UnsortedList() }
位置: pkg/kubelet/kubelet_node_status.go
1 2 3 4 func (kl *Kubelet) defaultNodeStatusFuncs() []func(*v1.Node) error { setters = append(setters, nodestatus.MachineInfo(kl.containerManager.GetDevicePluginResourceCapacity) }
运行pod时加载device资源 1 2 3 4 5 6 7 8 9 10 11 12 13 14 15 16 17 18 19 20 21 22 23 24 25 26 27 func (m *kubeGenericRuntimeManager) startContainer(podSandboxID string, podSandboxConfig *runtimeapi.PodSandboxConfig, spec *startSpec, pod *v1.Pod, podStatus *kubecontainer.PodStatus, pullSecrets []v1.Secret, podIP string, podIPs []string) (string, error) { // Step 1: pull the image. imageRef, msg, err := m.imagePuller.EnsureImageExists(pod, container, pullSecrets, podSandboxConfig) // 重要逻辑:生成容器的配置对象,该步骤就是真正使用device plugin的3个参数,并构建 containerConfig 对象, 使进一步传递。 containerConfig, cleanupAction, err := m.generateContainerConfig(container, pod, restartCount, podIP, imageRef, podIPs, target) // 将allocated cpus 和 memory numa node 信息丰富containerConfig对象。 err = m.internalLifecycle.PreCreateContainer(pod, container, containerConfig) // 调用runtime 服务的CreateContainer,并将容器的配置参数containerConfig传入运行时。 containerID, err := m.runtimeService.CreateContainer(podSandboxID, containerConfig, podSandboxConfig) // 容器创建好后,预启动,将新containerid 加入到 cpumanager、memoryManager、topologyManager进行管理 err = m.internalLifecycle.PreStartContainer(pod, container, containerID) // Step 3: start the container. err = m.runtimeService.StartContainer(containerID) // 容器启动后的hook // Step 4: execute the post start hook. if container.Lifecycle != nil && container.Lifecycle.PostStart != nil { ... } }
1 2 3 4 5 6 7 8 9 10 11 12 13 14 15 16 17 18 19 20 21 22 23 24 // 产生运行容器的配置项 // GetResources returns RunContainerOptions with devices, mounts, and env fields populated for // extended resources required by container. func (kl *Kubelet) GenerateRunContainerOptions(pod *v1.Pod, container *v1.Container, podIP string, podIPs []string) (*kubecontainer.RunContainerOptions, func(), error) { // 获取本container所需要的extended resource参数,env、device、mounts opts, err := kl.containerManager.GetResources(pod, container) // pod host的hostname及其domain hostname, hostDomainName, err := kl.GeneratePodHostNameAndDomain(pod) // 该pod attach&& mount成功的volume map。仅仅是volume本身的统计 volumes := kl.volumeManager.GetMountedVolumesForPod(podName) // 在pod sepc中, envFrom.ConfigMapRe、envFrom.SecretRef 和 container.Env注入的环境变量 envs, err := kl.makeEnvironmentVariables(pod, container, podIP, podIPs) // pod 中volume的挂载点,即统计container.VolumeMounts mounts, cleanupAction, err := makeMounts(pod, kl.getPodDir(pod.UID), container, hostname, hostDomainName, podIPs, volumes, kl.hostutil, kl.subpather, opts.Envs, supportsSingleFileMapping) // 所有pod的配置项,都封装到opts对象中 return opts, cleanupAction, nil }
这些不就是oci spec 中所需要的配置参数么, 原理是在这生成,并传给底层运行时的, 包括 device plugin。
为容器扩展资源所需要的 devices, mounts, and env fields
1 2 3 4 5 6 7 8 9 10 11 12 13 14 15 16 17 18 19 func (cm *containerManagerImpl) GetResources(pod *v1.Pod, container *v1.Container) (*kubecontainer.RunContainerOptions, error) { opts := &kubecontainer.RunContainerOptions{} // 为pod分配device 资源选项。 // 从 conatiner manager 中的device manager子模块所维护的podDevice这个对象,获取设备的信息。 devOpts, err := cm.deviceManager.GetDeviceRunContainerOptions(pod, container) if err != nil { return nil, err } else if devOpts == nil { return opts, nil } // 设备如下信息 opts.Devices = append(opts.Devices, devOpts.Devices...) opts.Mounts = append(opts.Mounts, devOpts.Mounts...) opts.Envs = append(opts.Envs, devOpts.Envs...) opts.Annotations = append(opts.Annotations, devOpts.Annotations...) return opts, nil }
至此 pod 将 device 配置获取到(包括,mount, device, env),并以 containerConfig 对象形式传给CRI了
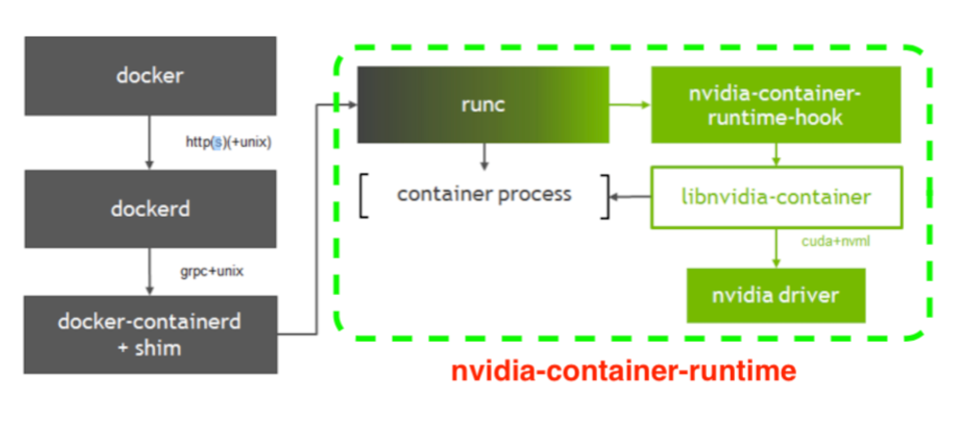
nvidia-container-runtime 容器模型containerd-shim 通过runc去执行容器。runtime-spec 和 image-spec, runc就是 runtine-spec的一种实现,而nvidia-container-runtime是为了支持容器使用GPU 而做的另一种 runtime-spec 的实现.
原理是利用 runtime-spec规范中提到的PreStart Hook机制在执行完runc start之后,在真正的用户进程启动之前,执行nviadia-container-runtime-hook进行一些操作,其针对GPU设备的挂载和device cgroup的设置是通过一个由C和C++实现的叫做nvidia-container-cli(libnvidia-container)的程序实现的;
中间的runc表示使用runc已经将容器构建起来了,只是容器进程启动前要执行hook; 此时是查看环境NVIDIA_VISIBLE_DEVICES
有, 通过该env的value拿到gpu id, 并调用nvidia-container-cli configure --device=ID(s) 来将gpu 卡挂在到容器中。
没有,则直接启动用户进程,和之前的runc逻辑完全一致。
nvidia-docker2 是在runc的基础上增加了hook, 所以它完全可以替代runc, 即gpu节点是用nvidia-docker2替换了runc而不是多runc扩展。
REF
https://zwforrest.github.io/post/devicemanager%E5%8E%9F%E7%90%86%E5%8F%8A%E5%88%86%E6%9E%90/ https://www.infoq.cn/article/tdfgiikxh9bcgknywl6s