在kubelet call cni 中分析了cri runtime调用cni plugin的流程。
cni plugin打通底层网络的方式各异,runtime如何使用cni plugin呢?
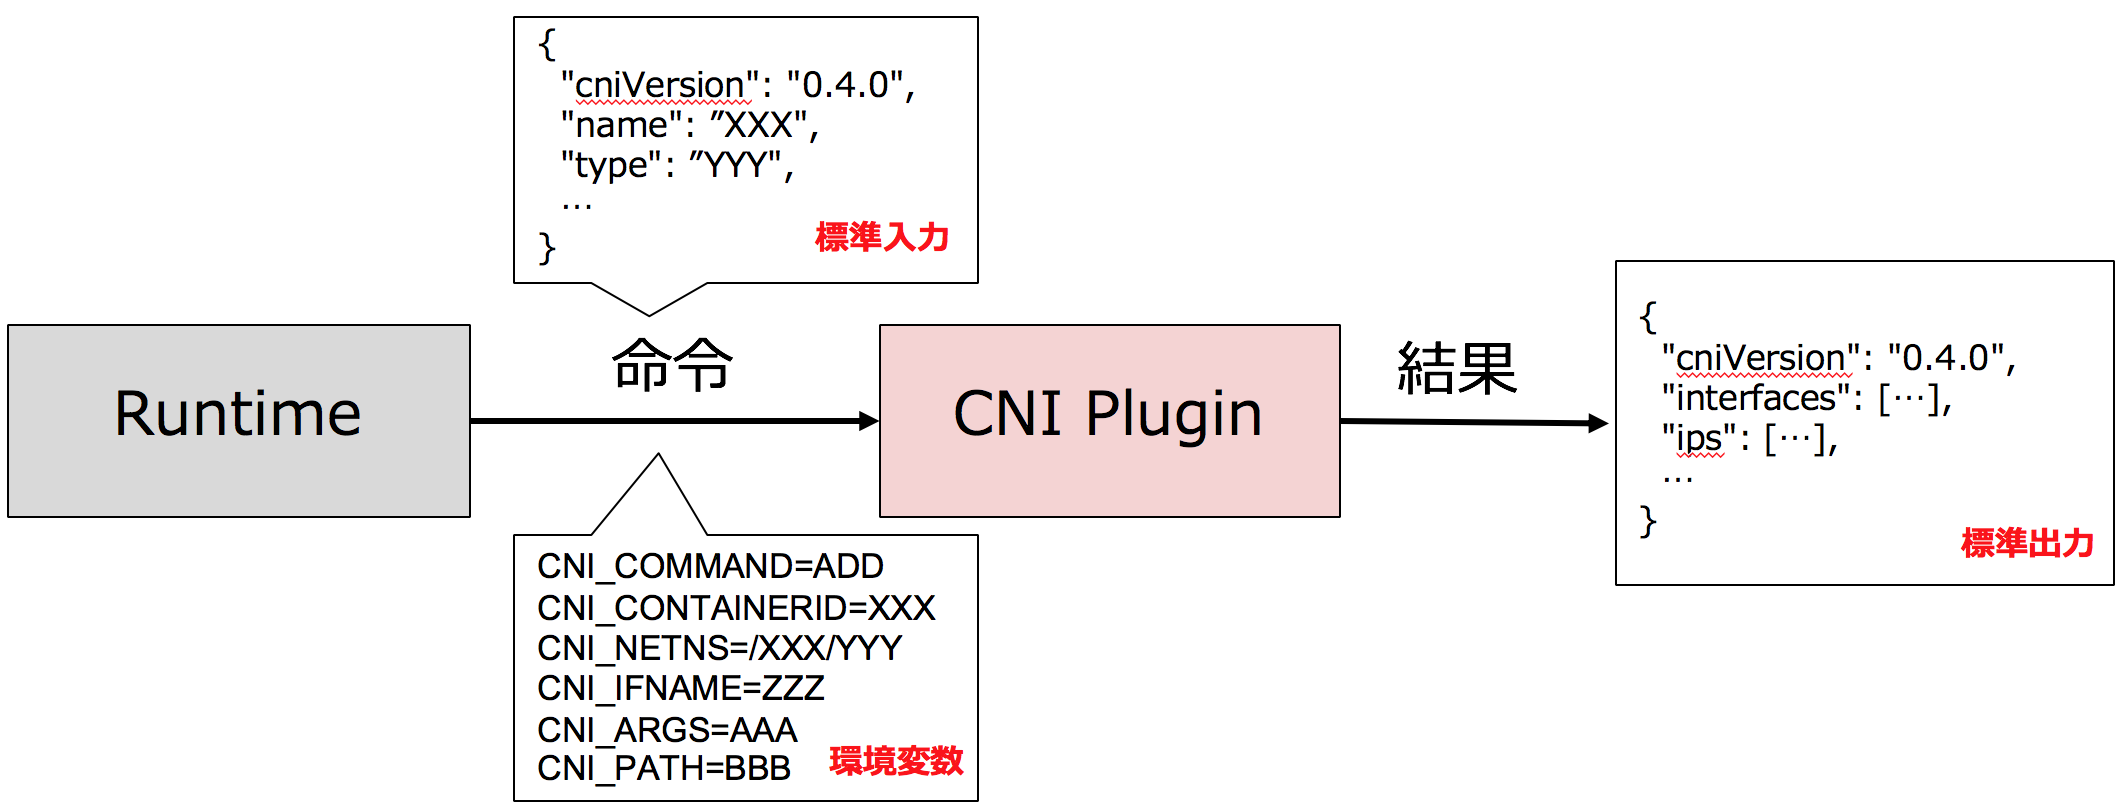
像csi一样规范使用cni plugin cri和csi规范,通过grpc协议规定好了接口方法,cni是通过binary方式调用,如何定义好规范?
思路
接口定义方法,方便runtime调用
插件公共的集群参数
插件各自的配置
runtime shim侧的pod参数pkg/kubelet/dockershim/network/cni/cni.go
1
2
3
4
5
6
7
8
9
10
11
12
13
14
15
16
17
18
19
20
21
22
23
24
25
26
27
28
29
30
31
32
33
34
35
36
37
38
39
40
41
42
43
44
45
46
func (plugin *cniNetworkPlugin) string , podNs string , podSandboxID kubecontainer.ContainerID, podNetnsPath string , annotations, options map [string ]string ) (*libcni.RuntimeConf, error ) { rt := &libcni.RuntimeConf{ Args: [][2 ]string { {"IgnoreUnknown" , "1" }, {"K8S_POD_NAMESPACE" , podNs}, {"K8S_POD_NAME" , podName}, {"K8S_POD_INFRA_CONTAINER_ID" , podSandboxID.ID}, }, } } func (c *CNIConfig) string , net *NetworkConfig, prevResult types.Result, rt *RuntimeConf) (types.Result, error ) { return invoke.ExecPluginWithResult(ctx, pluginPath, newConf.Bytes, c.args("ADD" , rt), c.exec) } func ExecPluginWithResult (ctx context.Context, pluginPath string , netconf []byte , args CNIArgs, exec Exec) error ) { stdoutBytes, err := exec.ExecPlugin(ctx, pluginPath, netconf, args.AsEnv()) } func (args *Args) string { env := os.Environ() pluginArgsStr := args.PluginArgsStr if pluginArgsStr == "" { pluginArgsStr = stringify(args.PluginArgs) } env = append (env, "CNI_COMMAND=" +args.Command, "CNI_CONTAINERID=" +args.ContainerID, "CNI_NETNS=" +args.NetNS, "CNI_ARGS=" +pluginArgsStr, "CNI_IFNAME=" +args.IfName, "CNI_PATH=" +args.Path, ) return dedupEnv(env) }
插件各自的配置 1 2 3 4 5 6 7 8 9 10 11 12 13 14 15 16 17 18 19 20 21 22 23 24 25 26 27 28 29 30 31 32 33 34 35 # cat 10-calico.conflist{ "name": "k8s-pod-network", // 全局参数, 会注入到每一个`cni plugin`中 "cniVersion": "0.3.1", "plugins": [ { "type": "calico", "datastore_type": "kubernetes", "mtu": 0, "nodename_file_optional": false, "log_level": "Info", "log_file_path": "/var/log/calico/cni/cni.log", "ipam": { "type": "calico-ipam", "assign_ipv4" : "true", "assign_ipv6" : "false"}, "container_settings": { "allow_ip_forwarding": false }, "policy": { "type": "k8s" }, "kubernetes": { "k8s_api_root":"https://10.20.0.1:443", "kubeconfig": "/etc/cni/net.d/calico-kubeconfig" } }, { "type": "bandwidth", "capabilities": {"bandwidth": true} }, { "type": "portmap", "snat": true, "capabilities": {"portMappings": true} } ] }
configList文件的对象libcni/api.go
1 2 3 4 5 6 7 8 9 10 11 12 type NetworkConfigList struct { Name string CNIVersion string DisableCheck bool Plugins []*NetworkConfig Bytes []byte } type NetworkConfig struct { Network *types.NetConf Bytes []byte }
某个cni plugin的配置pkg/types/types.go
1 2 3 4 5 6 7 8 9 10 11 12 13 type NetConf struct { CNIVersion string `json:"cniVersion,omitempty"` Name string `json:"name,omitempty"` Type string `json:"type,omitempty"` Capabilities map [string ]bool `json:"capabilities,omitempty"` IPAM IPAM `json:"ipam,omitempty"` DNS DNS `json:"dns"` RawPrevResult map [string ]interface {} `json:"prevResult,omitempty"` PrevResult Result `json:"-"` }
以calico cni plugin为例子, 需要多个cni plugin协同工作,所以配置文件中 plugins 是个列表,type 字段表明使用哪个cni plugin。
该配置文件参数的解析如下
1 2 3 4 5 6 7 8 9 10 11 12 13 14 15 16 17 18 19 20 21 22 23 24 25 26 27 28 func getDefaultCNINetwork (confDir string , binDirs []string ) error ) { files, err := libcni.ConfFiles(confDir, []string {".conf" , ".conflist" , ".json" }) sort.Strings(files) for _, confFile := range files { var confList *libcni.NetworkConfigList if strings.HasSuffix(confFile, ".conflist" ) { confList, err = libcni.ConfListFromFile(confFile) ... } else { ... conf, err := libcni.ConfFromFile(confFile) ... } return &cniNetwork{ name: confList.Name, NetworkConfig: confList, CNIConfig: cniConfig, Capabilities: caps, }, nil } return nil , fmt.Errorf("no valid networks found in %s" , confDir) }
接口定义方法 github.com/containernetworking/cni/libcni/api.go
1 2 3 4 5 6 7 8 9 10 11 12 13 14 15 16 17 18 19 type CNI interface { AddNetworkList(ctx context.Context, net *NetworkConfigList, rt *RuntimeConf) (types.Result, error ) CheckNetworkList(ctx context.Context, net *NetworkConfigList, rt *RuntimeConf) error DelNetworkList(ctx context.Context, net *NetworkConfigList, rt *RuntimeConf) error GetNetworkListCachedResult(net *NetworkConfigList, rt *RuntimeConf) (types.Result, error ) GetNetworkListCachedConfig(net *NetworkConfigList, rt *RuntimeConf) ([]byte , *RuntimeConf, error ) AddNetwork(ctx context.Context, net *NetworkConfig, rt *RuntimeConf) (types.Result, error ) CheckNetwork(ctx context.Context, net *NetworkConfig, rt *RuntimeConf) error DelNetwork(ctx context.Context, net *NetworkConfig, rt *RuntimeConf) error GetNetworkCachedResult(net *NetworkConfig, rt *RuntimeConf) (types.Result, error ) GetNetworkCachedConfig(net *NetworkConfig, rt *RuntimeConf) ([]byte , *RuntimeConf, error ) ValidateNetworkList(ctx context.Context, net *NetworkConfigList) ([]string , error ) ValidateNetwork(ctx context.Context, net *NetworkConfig) ([]string , error ) GetCachedAttachments(containerID string ) ([]*NetworkAttachment, error ) }
以AddNetworkList方法分析
1 2 3 4 5 6 7 8 9 10 func (plugin *cniNetworkPlugin) string , podNamespace string , podSandboxID kubecontainer.ContainerID, podNetnsPath string , annotations, options map [string ]string ) (cnitypes.Result, error ) { rt, err := plugin.buildCNIRuntimeConf(podName, podNamespace, podSandboxID, podNetnsPath, annotations, options) netConf, cniNet := network.NetworkConfig, network.CNIConfig res, err := cniNet.AddNetworkList(ctx, netConf, rt) }
github.com/containernetworking/cni/libcni/api.go
1 2 3 4 5 6 7 8 9 10 11 12 13 14 15 16 17 18 19 20 21 22 23 24 25 26 27 28 29 30 31 32 33 34 35 36 37 38 39 40 41 42 43 44 45 func (c *CNIConfig) error ) for _, net := range list.Plugins { ... result, err = c.addNetwork(ctx, list.Name, list.CNIVersion, net, result, rt) if err != nil { return nil , err } } func (c *CNIConfig) string , net *NetworkConfig, prevResult types.Result, rt *RuntimeConf) (types.Result, error ) { c.ensureExec() pluginPath, err := c.exec.FindInPath(net.Network.Type, c.Path) newConf, err := buildOneConfig(name, cniVersion, net, prevResult, rt) return invoke.ExecPluginWithResult(ctx, pluginPath, newConf.Bytes, c.args("ADD" , rt), c.exec) } func ExecPluginWithResult (ctx context.Context, pluginPath string , netconf []byte , args CNIArgs, exec Exec) error ) { stdoutBytes, err := exec.ExecPlugin(ctx, pluginPath, netconf, args.AsEnv()) } func (e *RawExec) string , stdinData []byte , environ []string ) ([]byte , error ) { stdout := &bytes.Buffer{} c := exec.CommandContext(ctx, pluginPath) c.Env = environ c.Stdin = bytes.NewBuffer(stdinData) c.Stdout = stdout c.Stderr = e.Stderr if err := c.Run(); err != nil { return nil , pluginErr(err, stdout.Bytes()) } return stdout.Bytes(), nil }
cni plugin 如何执行 cni plugin binary 如何获取stdindata和env var来执行,并返回结果
1 2 3 4 5 6 7 8 9 10 11 12 13 14 15 16 17 18 19 20 21 22 23 24 25 26 27 28 import github.com/containernetworking/cni/pkg/skelfunc main () skel.PluginMain(cmdAdd, cmdCheck, cmdDel, version.All, bv.BuildString("none" )) } func PluginMainWithError (cmdAdd, cmdCheck, cmdDel func (_ *CmdArgs) error , versionInfo version.PluginInfo, about string ) *types.Error { return (&dispatcher{ Getenv: os.Getenv, Stdin: os.Stdin, Stdout: os.Stdout, Stderr: os.Stderr, }).pluginMain(cmdAdd, cmdCheck, cmdDel, versionInfo, about) } func (t *dispatcher) func (_ *CmdArgs) error , versionInfo version.PluginInfo, about string ) *types.Error { cmd, cmdArgs, err := t.getCmdArgsFromEnv() switch cmd { case "ADD" : err = t.checkVersionAndCall(cmdArgs, versionInfo, cmdAdd) case "DEL" : ... default : return types.NewError(types.ErrInvalidEnvironmentVariables, fmt.Sprintf("unknown CNI_COMMAND: %v" , cmd), "" ) } return err }
如果cni plugin add流程有错误,会输出到os.Stdout
1 2 3 4 5 6 7 8 9 10 11 12 13 14 15 16 17 18 func PluginMain (cmdAdd, cmdCheck, cmdDel func (_ *CmdArgs) error , versionInfo version.PluginInfo, about string ) { if e := PluginMainWithError(cmdAdd, cmdCheck, cmdDel, versionInfo, about); e != nil { if err := e.Print(); err != nil { log.Print("Error writing error JSON to stdout: " , err) } os.Exit(1 ) } } func prettyPrint (obj interface {}) error { data, err := json.MarshalIndent(obj, "" , " " ) if err != nil { return err } _, err = os.Stdout.Write(data) return err }
通过github.com/containernetworking/cni/libcni这个package,规范了cni的使用姿势
如何调试cni呢?
该module还提供了cnitool工具,可以以binary形式调用cni plugin,其原理是和runtime使用cni plugin的姿势完全一致。
1 2 go get github.com/containernetworking/cni go install github.com/containernetworking/cni/cnitool
安装可应用程序,即该包下需有main(), 安装到<GOPATH>/bin/下
build plugins 1 2 3 4 5 git clone https: cd plugins ./build_linux.sh # or ./build_windows.sh
plugin编译到本项目bin目录下
创建/etc/cni/net.d/10-myptp.conf 1 2 3 4 $ echo '{"cniVersion":"0.4.0","name":"myptp","type":"ptp","ipMasq":true,"ipam":{"type":"host-local","subnet":"172.16.29.0/24","routes":[{"dst":"0.0.0.0/0"}]}}' | sudo tee /etc/cni/net.d/10 -myptp.conf $ ip netns add testing 此时网络空间只有`lo` 网络
将容器加入网络 不是网络加入容器
1 2 3 4 5 6 7 8 9 10 11 12 13 14 15 16 17 18 19 20 21 22 23 24 25 26 27 28 29 $ CNI_PATH=./bin cnitool add myptp /var/run/netns/testing { "cniVersion": "0.4.0", "interfaces": [ { "name": "veth901f3f45", "mac": "c6:28:60:c6:cc:a8" }, { "name": "eth0", "mac": "d6:30:5f:05:21:dd", "sandbox": "/var/run/netns/testing" } ], "ips": [ { "version": "4", "interface": 1, "address": "172.16.29.2/24", "gateway": "172.16.29.1" } ], "routes": [ { "dst": "0.0.0.0/0" } ], "dns": {} }
host侧
1 2 3 4 5 6 7 8 9 10 # ip a 26: veth901f3f45@if2: <BROADCAST,MULTICAST,UP,LOWER_UP> mtu 1500 qdisc noqueue state UP group default link/ether c6:28:60:c6:cc:a8 brd ff:ff:ff:ff:ff:ff link-netns testing inet 172.16.29.1/32 scope global veth901f3f45 valid_lft forever preferred_lft forever inet6 fe80::c428:60ff:fec6:cca8/64 scope link valid_lft forever preferred_lft forever # ip r | grep f45 172.16.29.2 dev veth901f3f45 scope host
host侧, veth pair设备及router均配置好
ns侧
1 2 3 4 5 6 7 8 9 10 11 12 13 14 15 # ip netns exec testing ip a 1: lo: <LOOPBACK> mtu 65536 qdisc noop state DOWN group default qlen 1000 link/loopback 00:00:00:00:00:00 brd 00:00:00:00:00:00 2: eth0@if26: <BROADCAST,MULTICAST,UP,LOWER_UP> mtu 1500 qdisc noqueue state UP group default link/ether d6:30:5f:05:21:dd brd ff:ff:ff:ff:ff:ff link-netnsid 0 inet 172.16.29.2/24 brd 172.16.29.255 scope global eth0 valid_lft forever preferred_lft forever inet6 fe80::d430:5fff:fe05:21dd/64 scope link valid_lft forever preferred_lft forever # ip netns exec testing ip r default via 172.16.29.1 dev eth0 172.16.29.0/24 via 172.16.29.1 dev eth0 src 172.16.29.2 //下一跳指向host侧的veth pair口 172.16.29.1 dev eth0 scope link src 172.16.29.2
ns中增加了一个网络,在ns侧生成新的eth0 interface;在host侧对应的veth pair是veth901f3f45veth pair的地址。
检查联通性 1 2 3 4 5 6 7 8 9 10 从host上ping ns # ping 172.16.29.2 PING 172.16.29.2 (172.16.29.2) 56(84) bytes of data. 64 bytes from 172.16.29.2: icmp_seq=1 ttl=64 time=0.879 ms 从ns ping host上网卡 # ip netns exec testing ping 10.211.55.5 PING 10.211.55.5 (10.211.55.5) 56(84) bytes of data. 64 bytes from 10.211.55.5: icmp_seq=1 ttl=64 time=1.78 ms
清理 1 2 CNI_PATH=./bin cnitool del myptp /var/run/netns/testing sudo ip netns del testing
cni plugin 的实现 官方实现:https://github.com/containernetworking/plugins
host-local 保证分配ip不冲突https://www.cni.dev/plugins/current/ipam/host-local/
calico 自定义实现 调用github.com/vishvananda/netlink
pod cidr的更新 how to update pod cidr
总结
cni仓库的libcni包时runtime更方便使用cni plugin,即将配置文件参数和环境变量参数作为具体cni plugin binary的执行参数.
plugins仓库有官方实现的cni plugin,因为有些网络功能是基础或者公用的。
cnitool使开发者以runtime角度去使用cni plugin且方便debug
Ref
https://www.cni.dev/docs/cnitool/